Android 物联网应用开发实例

Android 可以采用 Kotlin、Java、C++ 语言编写应用程序,Android SDK 会将这些代码连同相应的数据和资源文件编译为 Android 软件包,即一个带有.apk后缀的归档文件,也就是 Android 应用程序的安装文件。本质上 Android 系统是一种多用户的 Linux 系统,每个应用程序都运行在独立的 Linux 用户 ID进程之下,从而为每个 Android 应用都提供了独立的安全沙盒,体现了最小权限的设计原则。

鉴于 Google 官方提供了完善的文档,本文并不过多过深的涉及 Android SDK 开发的具体知识细节,仅会在简单介绍 Android 开发当中的一些基本概念之后,着重分析经典/低功耗蓝牙NFCWIFI指纹识别5G 等硬件外设的通信协议概念以及相应的实现步骤,并且展示一些比较典型的应用场景与示例代码,从而为读者在进行物联网相关项目的开发时,在移动设备应用控制端提供即有的现成经验。

Hello Android

打开 Android Studio,鼠标点击【+ Start a new Android Studio project】选项:

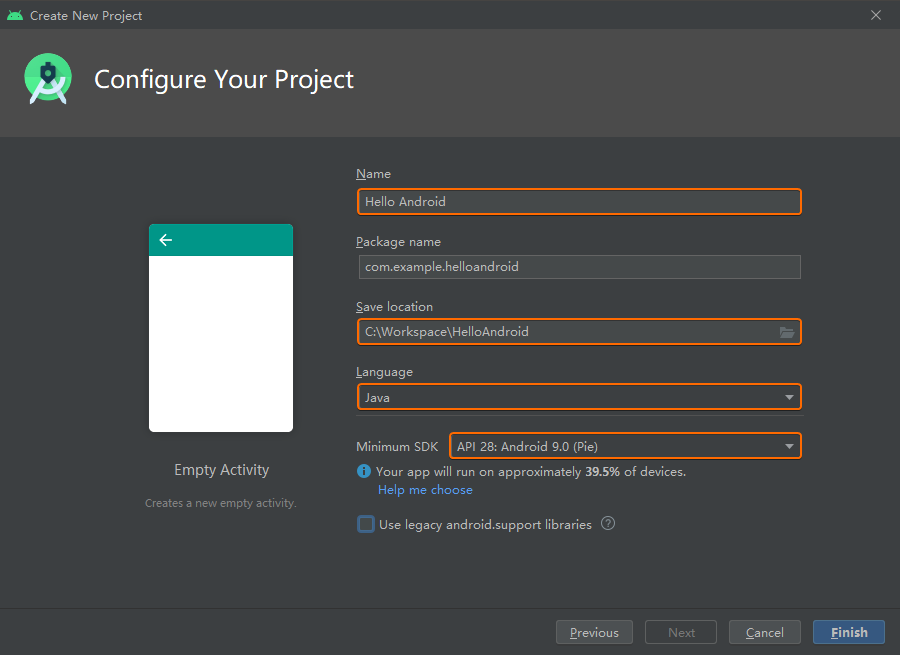
在 Create New Project 窗口当中,选择【Empty Activity】,然后点击【Next】:

在 Configure your project 窗口当中,填写如下信息:

经过上述步骤新建的 Hello Android 项目下面有如下 4 个比较重要的源文件:
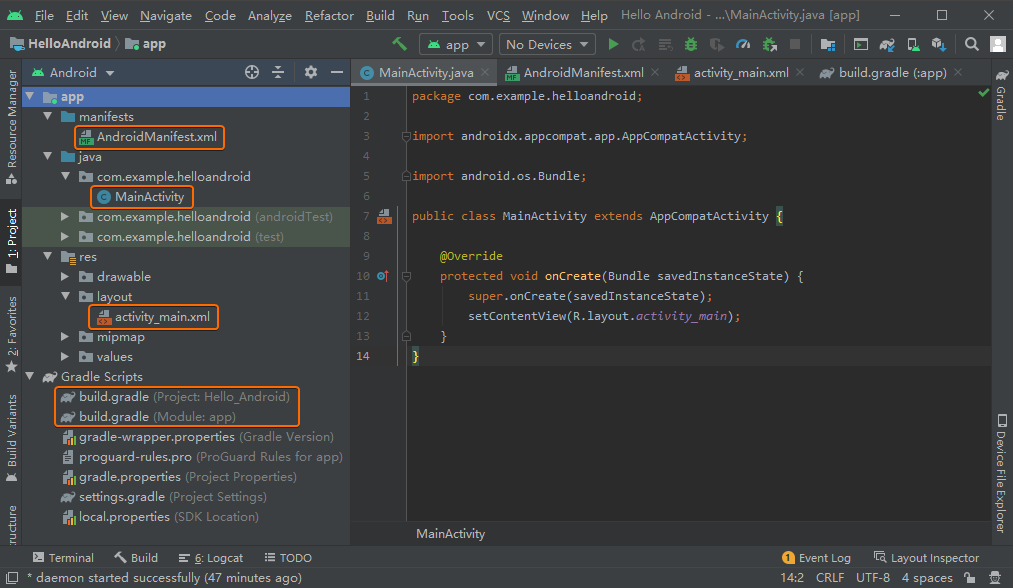
MainActivity.java

app > java > com.example.myfirstapp > MainActivity,主 Activity 是应用程序的入口点,程序运行时会首先启动该 Activity 的实例并且加载其对应的布局。

1
2
3
4
5
6
7
8
9
10
11
12
13
14
package com.example.helloandroid;

import androidx.appcompat.app.AppCompatActivity;

import android.os.Bundle;

public class MainActivity extends AppCompatActivity {

@Override
protected void onCreate(Bundle savedInstanceState) {
super.onCreate(savedInstanceState);
setContentView(R.layout.activity_main);
}
}

activity_main.xml

app > res > layout > activity_main.xml,用于定义主 Activity 的 XML 界面布局文件。

1
2
3
4
5
6
7
8
9
10
11
12
13
14
15
16
17
18
<?xml version="1.0" encoding="utf-8"?>
<androidx.constraintlayout.widget.ConstraintLayout xmlns:android="http://schemas.android.com/apk/res/android"
xmlns:app="http://schemas.android.com/apk/res-auto"
xmlns:tools="http://schemas.android.com/tools"
android:layout_width="match_parent"
android:layout_height="match_parent"
tools:context=".MainActivity">

<TextView
android:layout_width="wrap_content"
android:layout_height="wrap_content"
android:text="Hello World!"
app:layout_constraintBottom_toBottomOf="parent"
app:layout_constraintLeft_toLeftOf="parent"
app:layout_constraintRight_toRightOf="parent"
app:layout_constraintTop_toTopOf="parent" />

</androidx.constraintlayout.widget.ConstraintLayout>

AndroidManifest.xml

工程清单文件app > manifests > AndroidManifest.xml,用于描述应用程序的基本特性,定义应用程序所使用到的组件。

1
2
3
4
5
6
7
8
9
10
11
12
13
14
15
16
17
18
19
20
21
<?xml version="1.0" encoding="utf-8"?>
<manifest xmlns:android="http://schemas.android.com/apk/res/android"
package="com.example.helloandroid">

<application
android:allowBackup="true"
android:icon="@mipmap/ic_launcher"
android:label="@string/app_name"
android:roundIcon="@mipmap/ic_launcher_round"
android:supportsRtl="true"
android:theme="@style/AppTheme">
<activity android:name=".MainActivity">
<intent-filter>
<action android:name="android.intent.action.MAIN" />

<category android:name="android.intent.category.LAUNCHER" />
</intent-filter>
</activity>
</application>

</manifest>

build.gradle

Gradle Scripts > build.gradle 存在 2 个同名文件,分别针对项目Project: Hello_Android和模块Module: app,Android 应用的每个模块都拥有各自的build.gradle文件,本项目当前仅拥有app一个模块。

build.gradle (Project: Hello_Android)

1
2
3
4
5
6
7
8
9
10
11
12
13
14
15
16
17
18
19
20
21
22
23
24
// Top-level build file where you can add configuration options common to all sub-projects/modules.
buildscript {
repositories {
google()
jcenter()
}
dependencies {
classpath "com.android.tools.build:gradle:4.0.0"

// NOTE: Do not place your application dependencies here; they belong
// in the individual module build.gradle files
}
}

allprojects {
repositories {
google()
jcenter()
}
}

task clean(type: Delete) {
delete rootProject.buildDir
}

build.gradle (Module: app)

1
2
3
4
5
6
7
8
9
10
11
12
13
14
15
16
17
18
19
20
21
22
23
24
25
26
27
28
29
30
31
32
33
apply plugin: 'com.android.application'

android {
compileSdkVersion 29
buildToolsVersion "29.0.3"

defaultConfig {
applicationId "com.example.helloandroid"
minSdkVersion 28
targetSdkVersion 29
versionCode 1
versionName "1.0"

testInstrumentationRunner "androidx.test.runner.AndroidJUnitRunner"
}

buildTypes {
release {
minifyEnabled false
proguardFiles getDefaultProguardFile('proguard-android-optimize.txt'), 'proguard-rules.pro'
}
}
}

dependencies {
implementation fileTree(dir: "libs", include: ["*.jar"])
implementation 'androidx.appcompat:appcompat:1.1.0'
implementation 'androidx.constraintlayout:constraintlayout:1.1.3'
testImplementation 'junit:junit:4.12'
androidTestImplementation 'androidx.test.ext:junit:1.1.1'
androidTestImplementation 'androidx.test.espresso:espresso-core:3.2.0'

}

核心概念

基本组件

Android 应用组件拥有活动Activity服务Service广播接收器BroadcastReceiver内容提供器ContentProvider共 4 种基本类型:

  • 活动Activity:是用户交互的入口点,表示的是拥有界面的单个屏幕,通过继承Activity类来实现;
  • 服务Service:表示一种运行在后台的组件,并不会提供界面,用于执行长时间运行的操作或者为其它进程执行任务,通过继承Service类来实现;
  • 广播接收器BroadcastReceiver:Android 借助该组件向应用传递事件,从而允许应用响应系统范围的广播通知。虽然广播接收器不会显示界面,但是可以创建状态栏通知以提醒用户,通过继承BroadcastReceiver类实现;
  • 内容提供器ContentProvider:用于管理共享的应用数据,可以将这些数据存储在文件系统、SQLite 数据库、网络或者应用可访问的其它存储位置。其它应用则可以通过内容提供器查询、修改数据,通过继承ContentProvider类实现;

组件启动

上述 4 种组件类型当中,ActivityServiceBroadcastReceiver三种均可以通过异步消息Intent进行启动,Intent会在运行时将各个组件绑定在一起,因此可以将Intent视为组件间操作的纽带。Intent通过Intent对象进行创建,该对象可以通过定义消息来启动特定组件(显式)或者组件类型(隐式)。

使用Intent可以启动ActivityServiceBroadcastReceiver组件,我们即可以在Intent使用类名显式声明目标组件,也可以使用隐式的Intent来描述所要执行的操作类型与待操作数据。如果当前存在多个可执行Intent描述操作的组件,则由用户通过过滤器选择具体使用哪一个。

对于ActivityServiceIntent会定义所要执行的操作,并且可以指定待操作数据的URI,以及当前正在启动组件所需的信息。对于BroadcastReceiverIntent仅会定义当前等待广播的通知信息。而ContentProvider并非由Intent启动,它只会在成为内容解析器ContentResolver的请求目标时才会启动。

  • 启动Activity,如果需要让Activity返回结果,可以向startActivity()或者startActivityForResult()传递Intent,或者为其安排其它任务;
  • 通过向startService()传递Intent启动Service,或者可以向bindService()传递Intent来绑定到该服务;
  • 发起广播,可以向sendBroadcast()sendOrderedBroadcast()sendStickyBroadcast()等方法传递Intent
  • ContentProvider提供查询服务,可以在ContentResolver上调用query()

工程清单文件

Android 系统启动应用组件之前,必须通过读取工程清单文件AndroidManifest.xml确认组件存在,因此必须在该文件中声明所有组件,且该文件必须位于工程的根目录。除此之外,清单文件还拥有如下的用途:

  • 声明应用所需的权限,例如:互联网访问权限或者联系人的读取权限;
  • 声明应用所需的最低 API 级别;
  • 声明应用所需的软硬件功能,例如:相机、蓝牙、多点触摸屏幕;
  • 声明应用链接的 API 库,例如:Google 地图库;

下面代码中,<application>元素的android:icon属性用于标识应用的图标,<activity>元素的android:name属性指定了对应Activity子类的完整类名,android:label属性指定用于Activity的用户可见标签字符串。

1
2
3
4
5
6
7
8
<?xml version="1.0" encoding="utf-8"?>
<manifest ... >
<application android:icon="@drawable/app_icon.png" ... >
<activity android:name="com.example.project.ExampleActivity" android:label="@string/example_label" ... >
</activity>
... ... ...
</application>
</manifest>

活动Activity服务Service广播接收器BroadcastReceiver内容提供器ContentProvider分别对应AndroidManifest.xml当中的<activity><service><receiver><provider>元素。如果没有在工程清单文件中提供这些内容,那么这些组件在系统运行时是不可见的,永远都不会得到执行。

组件 XML 声明

上述的ActivityServiceBroadcastReceiver组件都可以使用Intent进行启动,即可以通过在Intent中显式命名目标组件的类名来使用Intent,还可以使用隐式Intent来描述所要执行的操作类型和数据。通过隐式Intent,Android 可以在设备上查询并启动可以执行该操作的组件。如果存在多个组件可以执行Intent所描述的操作,则由开发人员选择具体使用哪个组件。

通过将接收到的Intent与设备上其它应用的AndroidManifest.xml工程清单文件上的Intent过滤器相比较,Android 系统就可以正确的查询出可以响应该Intent的组件。AndroidManifest.xml当中声明Activity时,可以添加<intent-filter>元素作为Activity的子元素,从而为该组件声明一个Intent过滤器。

例如,构建一个包含撰写新邮件Activity的电子邮件应用程序,可以通过声明Intent过滤器来响应名称为sendIntent来实现发送新邮件的目的:

1
2
3
4
5
6
7
8
9
10
11
12
<?xml version="1.0" encoding="utf-8"?>
<manifest ... >
<application ... >
<activity android:name="com.example.project.ComposeEmailActivity">
<intent-filter>
<action android:name="android.intent.action.SEND" />
<data android:type="*/*" />
<category android:name="android.intent.category.DEFAULT" />
</intent-filter>
</activity>
</application>
</manifest>

如果设备上另一个应用创建包含有ACTION_SEND操作的Intent并将其传递给startActivity(),则系统就会启动该Activity完成邮件发送操作。

其它 XML 声明

Android 设备比较碎片化,并非所有设备都提供相同的特性与功能,为了防止将应用安装在缺少相关特性的设备上,必须在AndroidManifest.xml工程清单文件中声明设备与软件要求。Android 操作系统本身并不会读取其中的大部分声明,但是Google Play等应用商店会读取这些信息,从而便于用户搜索应用提供相应的过滤功能。

例如,如果当前设备的应用需要相机功能,并使用Android 2.1(API 级别 7)中引入的 API,则可以在AndroidManifest.xml中声明如下要求:

1
2
3
4
5
6
<?xml version="1.0" encoding="utf-8"?>
<manifest ... >
<uses-feature android:name="android.hardware.camera.any" android:required="true" />
<uses-sdk android:minSdkVersion="7" android:targetSdkVersion="19" />
...... ......
</manifest>

,没有相机且 Android 版本低于 2.1 的设备将无法从 Google Play 安装您的应用。不过,您可以声明您的应用使用相机,但并不要求必须使用。在此情况下,您的应用必须将 required 属性设置为 false,并在运行时检查设备是否拥有相机,然后根据需要停用任何相机功能。

应用资源

Android 应用当中的图片、音频等资源,Android SDK 都会为其定义唯一的整型ID,在工程当中可以利用该ID引用这些资源。例如,SDK 会为工程res/drawable/目录下的logo.png图像文件生成名为R.drawable.logo的整型资源 ID,然后在代码中就可以通过该 ID 引用图像。

通过代码与资源的分离,可以方便的为不同设备提供对应的备用资源,Android 支持许多不同的备用资源限定符。限定符是资源目录名称中加入的短字符串,用于定义这些资源适用的设备配置。例如:根据设屏幕方向与尺寸为Activity创建不同的布局,当需要更换布局时,可以对每个布局的目录名称采用限定符,这样系统就会根据当前设备的水平和垂直方向自动应用对应的布局。

经典蓝牙

传统蓝牙适用于较为耗电的操作,可用于 Android 设备之间数据流的传输等场景。Android SDK 提供的 Bluetooth API 可以完成蓝牙通信的 4 大任务:设置蓝牙查找区域内的配对设备或者可用设备连接设备在设备之间传输数据

蓝牙设备之间进行数据传输之前,首先必须通过配对形成通信通道,即将其中一台设备设置为可检测状态,另一台设备通过搜索发现该设备,两个设备配对期间会交换并且缓存安全密钥,以供下次连接使用。配对完成以后,两台设备即可开始进行数据传输。会话完成以后,两台设备仍将维持绑定状态,未来如果需要再次打开连接会话,则需要两个设备在有效通信距离内均未移除绑定,即可自动完成连接。

权限

Android 应用中使用蓝牙功能,必须在工程清单文件AndroidManifest.xml声明如下 3 个权限:

  1. BLUETOOTH权限:需要该权限才能执行蓝牙通信任务;
  2. BLUETOOTH_ADMIN权限:用于启动设备发现或者操作设备的蓝牙设置;
  3. ACCESS_FINE_LOCATION权限:由于蓝牙扫描可用于收集用户位置信息,此类信息通常来自用户设备或者各种外设蓝牙信标;
1
2
3
4
5
6
7
8
<manifest ... >
<uses-permission android:name="android.permission.BLUETOOTH" />
<uses-permission android:name="android.permission.BLUETOOTH_ADMIN" />

<!-- 针对 Android 9 或者更低的版本,可以声明为 ACCESS_COARSE_LOCATION 代替 -->
<uses-permission android:name="android.permission.ACCESS_FINE_LOCATION" />
... ... ...
</manifest>

蓝牙 Profile

蓝牙 Profile 是适用于蓝牙设备之间不同应用场景的一系列协议栈,Android 的蓝牙 API 为如下 Profile 提供了实现:

  • 蓝牙耳机:提供BluetoothHeadset类控制蓝牙耳机服务代理;
  • 蓝牙立体声音频传输:提供BluetoothA2dp类控制蓝牙 A2DP 服务代理;
  • 健康设备:提供 Bluetooth Health API 控制蓝牙健康设备,包含有BluetoothHealthBluetoothHealthCallbackBluetoothHealthAppConfiguration类;

蓝牙 Profile 的基本使用步骤如下所示:

  1. 获取默认适配器;
  2. 设置BluetoothProfile.ServiceListener监听BluetoothProfile客户端,在其连接或者断开服务时向其发送通知;
  3. 使用getProfileProxy()与 Profile 关联的设备对象建立连接;
  4. 通过onServiceConnected()获取 Profile 代理对象的句柄;
  5. 获得 Profile 代理对象后,可以监视连接状态,并执行与其相关的其它操作;

下面的示例代码,Profile 的代理对象是 1 个用于控制耳机的BluetoothHeadset实例:

1
2
3
4
5
6
7
8
9
10
11
12
13
14
15
16
17
18
19
20
21
22
23
24
25
BluetoothHeadset bluetoothHeadset;

/* 获取默认适配器 */
BluetoothAdapter bluetoothAdapter = BluetoothAdapter.getDefaultAdapter();

private BluetoothProfile.ServiceListener profileListener = new BluetoothProfile.ServiceListener() {
public void onServiceConnected(int profile, BluetoothProfile proxy) {
if (profile == BluetoothProfile.HEADSET) {
bluetoothHeadset = (BluetoothHeadset) proxy;
}
}
public void onServiceDisconnected(int profile) {
if (profile == BluetoothProfile.HEADSET) {
bluetoothHeadset = null;
}
}
};

/* 建立到代理的连接 */
bluetoothAdapter.getProfileProxy(context, profileListener, BluetoothProfile.HEADSET);

/* 调用蓝牙耳机呼叫功能 */

/* 使用后关闭代理连接 */
bluetoothAdapter.closeProfileProxy(bluetoothHeadset);

设置蓝牙

如果当前 Android 设备不支持蓝牙,则应该停用应用的蓝牙功能;如果设备支持蓝牙,但是已经停用该功能,则应在不离开应用的同时启用蓝牙。

所有蓝牙相关的Activity都需要使用BluetoothAdapter(代表当前设备的蓝牙适配器),通过调用静态的getDefaultAdapter()方法可以获取BluetoothAdapter对象,如果该方法返回null,则表示设备不支持蓝牙。

1
2
3
4
BluetoothAdapter bluetoothAdapter = BluetoothAdapter.getDefaultAdapter();
if (bluetoothAdapter == null) {
// 当设备不支持蓝牙时
}

接下来需要调用isEnabled()判断蓝牙是否启用,该方法返回false表示蓝牙处于停用状态,那么调用startActivityForResult()可以启用蓝牙,并且传入ACTION_REQUEST_ENABLE作为 Intent 参数向系统设置请求启用蓝牙。

1
2
3
4
if (!bluetoothAdapter.isEnabled()) {
Intent enableBtIntent = new Intent(BluetoothAdapter.ACTION_REQUEST_ENABLE);
startActivityForResult(enableBtIntent, REQUEST_ENABLE_BT);
}

此时系统显示【请求用户允许启用蓝牙】的对话框,如果选择【Yes】就会启用蓝牙,完成后焦点将会返回应用。

传递给startActivityForResult()REQUEST_ENABLE_BT常量为局部定义的正整数,Android 系统会将该常量回传至onActivityResult()requestCode参数。成功启用蓝牙以后,Activity 就会在onActivityResult()回调中接收到RESULT_OK结果代码,如果蓝牙启动失败,则返回的结果代码为RESULT_CANCELED

注意:除此之外,每当系统蓝牙状态发生变化时,系统都会广播 ACTION_STATE_CHANGED 这个 Intent。该广播包含EXTRA_STATE(目前的蓝牙状态)和EXTRA_PREVIOUS_STATE(之前的蓝牙状态)两个额外字段。这些额外字段的取值包含STATE_TURNING_ONSTATE_ONSTATE_TURNING_OFFSTATE_OFF

查找设备

BluetoothAdapter还可用于扫描附近可被发现的蓝牙设备,这些设备会共享名称、类型、MAC 地址来响应扫描请求。当扫描设备与可被发现设备建立连接以后,Android 系统就会自动向用户显示配对请求。完成配对以后,Android 系统会保存该设备的名称、类型、MAC 地址,借助这些设备的 MAC 地址,可以随时向其发起连接,而无需再次执行发现操作。

调用BluetoothAdapter提供的getBondedDevices(),可以返回一组表示已经配对设备的BluetoothDevice对象,进而可以查询每台设备的名称和 MAC 地址。

1
2
3
4
5
6
7
8
Set<BluetoothDevice> pairedDevices = bluetoothAdapter.getBondedDevices();

if (pairedDevices.size() > 0) {
for (BluetoothDevice device : pairedDevices) {
String deviceName = device.getName(); // 获取设备名称
String deviceHardwareAddress = device.getAddress(); // 获取 MAC 地址
}
}

注意:调用startDiscovery()可以发现附近的蓝牙设备(12 秒),该操作为异步的进程,最后返回一个用于标示发现进程是否成功启动的布尔值。

Android 系统会为每台设备广播ACTION_FOUND这个 Intent,因此必须为其注册一个BroadcastReceiver,以便接收每台被发现设备的相关信息。该 Intent 包含EXTRA_DEVICE(包含BluetoothDevice类)和EXTRA_CLASS(包含BluetoothClass类)两个额外字段。下面代码段展示了发现设备时,如何处理ACTION_FOUND广播:

1
2
3
4
5
6
7
8
9
10
11
12
13
14
15
16
17
18
19
20
21
22
23
24
25
26
27
28
@Override
protected void onCreate(Bundle savedInstanceState) {
...
/* 当设备被发现时,将其注册到广播 */
IntentFilter filter = new IntentFilter(BluetoothDevice.ACTION_FOUND);
registerReceiver(receiver, filter);
}

/* 为 ACTION_FOUND 建立一个 BroadcastReceiver */
private final BroadcastReceiver receiver = new BroadcastReceiver() {
public void onReceive(Context context, Intent intent) {
String action = intent.getAction();
if (BluetoothDevice.ACTION_FOUND.equals(action)) {
/* 发现设备后就从 Intent 中获取蓝牙设备对象及其信息 */
BluetoothDevice device = intent.getParcelableExtra(BluetoothDevice.EXTRA_DEVICE);
String deviceName = device.getName(); // 获取设备名称
String deviceHardwareAddress = device.getAddress(); // 获取 MAC 地址
}
}
};

@Override
protected void onDestroy() {
super.onDestroy();
...
/* 不要忘记取消 ACTION_FOUND 接收器的注册 */
unregisterReceiver(receiver);
}

使用ACTION_REQUEST_DISCOVERABLE这个 Intent 调用startActivityForResult(Intent, int)方法,可以将本机设备设置为可检测状态,这样可以避免进入到设置界面进行相关操作。Android 设备默认处于可检测模式的时间为120秒,通过设置EXTRA_DISCOVERABLE_DURATION这个额外属性定义持续时间,最高设置达3600秒。下面示例将 Android 设备的蓝牙可被检测时间设置为300秒:

1
2
3
Intent discoverableIntent = new Intent(BluetoothAdapter.ACTION_REQUEST_DISCOVERABLE);
discoverableIntent.putExtra(BluetoothAdapter.EXTRA_DISCOVERABLE_DURATION, 300);
startActivity(discoverableIntent);

此时 Android 系统会显示【请求用户允许将设备设为可检测模式】对话框,如果用户选择【Yes】,则设备进入可检测模式,并在指定时间内保持该模式。然后 Activity 将会执行onActivityResult()回调函数。如果用户选择【No】则结果代码为RESULT_CANCELED

如果希望设备检测状态发生变化时接收通知,则可以考虑为ACTION_SCAN_MODE_CHANGED这个 Intent 注册BroadcastReceiver。该Intent包含EXTRA_SCAN_MODEEXTRA_PREVIOUS_SCAN_MODE两个额外字段,每个属性可以包含这些值:SCAN_MODE_CONNECTABLE_DISCOVERABLE(设备处于可检测模式)、SCAN_MODE_CONNECTABLE(设备未处于可检测模式,但是仍然能够接收连接)、SCAN_MODE_NONE(设备未处于可检测模式,并且无法接收到连接)。

连接设备

两台连接的设备必须分别同时实现服务端(开放服务器 Socket 服务)和客户端(使用服务器设备的 MAC 地址发起连接),当打开设备之间连接的 RFCOMM 通道以后,通过BluetoothSocket即可完成双向的流式数据传输。

服务端

服务端设备需要保持开放的BluetoothServerSocket监听听传入的连接请求,并在接受到请求后提供已连接的BluetoothSocket(即从BluetoothServerSocket获取BluetoothSocket)。设置 Socket 服务并接受连接,需要依次实现如下步骤:

  1. 调用listenUsingRfcommWithServiceRecord(String, UUID)获取BluetoothServerSocket。其中参数String是服务的可识别名称,参数UUID是 128 位的通用唯一标识符,用于对应用的蓝牙服务进行唯一化标识;这 2 个参数都会被写入新服务发现协议 (SDP)的数据库。
  2. 调用accept()监听连接请求,该函数为阻塞调用,当服务器接受连接或者发生异常,该调用就会中断返回。仅当客户端发送包含UUID的连接请求,且该UUID与服务端注册的UUID匹配时,服务端才会接受连接。连接成功以后,accept()返回已经连接的 BluetoothSocket
  3. 调用close()关闭连接,释放服务端 Socket 及其占用的资源,但是并不会关闭accept()返回的已连接BluetoothSocketRFCOMM 只允许每个通道存在 1 个已连接客户端,因此服务端接收到已连接的 Socket 之后,就可以立刻在BluetoothServerSocket上调用close()
1
2
3
4
5
6
7
8
9
10
11
12
13
14
15
16
17
18
19
20
21
22
23
24
25
26
27
28
29
30
31
32
33
34
35
36
37
38
39
40
41
42
43
44
private class AcceptThread extends Thread {
private final BluetoothServerSocket mmServerSocket;

public AcceptThread() {
/* 由于 mmServerSocket 是 final 的,所以使用一个稍后分配给 mmServerSocket 的临时对象 */
BluetoothServerSocket tmp = null;
try {
/* MY_UUID 是应用的 UUID 字符串, 客户端需要使用同样的编码 */
tmp = bluetoothAdapter.listenUsingRfcommWithServiceRecord(NAME, MY_UUID);
} catch (IOException e) {
Log.e(TAG, "Socket's listen() method failed", e);
}
mmServerSocket = tmp;
}

public void run() {
BluetoothSocket socket = null;
/* 继续监听,直至出现异常返回套接字为止 */
while (true) {
try {
socket = mmServerSocket.accept();
} catch (IOException e) {
Log.e(TAG, "Socket's accept() method failed", e);
break;
}

if (socket != null) {
/* 在单独的线程中接收 1 个连接 */
manageMyConnectedSocket(socket);
mmServerSocket.close();
break;
}
}
}

/* 关闭连接,结束线程 */
public void cancel() {
try {
mmServerSocket.close();
} catch (IOException e) {
Log.e(TAG, "Could not close the connect socket", e);
}
}
}

注意BluetoothServerSocketBluetoothSocket中的所有方法都是线程安全的方法。由于accept()是阻塞调用,因此不能在主 Activity 界面线程执行该调用,通常需要在一个新的线程中完成所有涉及BluetoothServerSocket或者BluetoothSocket的工作。如果要取消accept()等被阻塞的调用,同样通过另一个线程,在BluetoothServerSocket或者BluetoothSocket上调用close()

客户端

客户端必须首先获取表示该远程设备的BluetoothDevice对象,然后从中获取BluetoothSocket并且发起连接,基本步骤如下所示:

  1. 使用BluetoothDevice,通过调用createRfcommSocketToServiceRecord(UUID)获取BluetoothSocket。该方法会初始化BluetoothSocket对象,以用于客户端连接至BluetoothDevice。此处UUID必须与服务端listenUsingRfcommWithServiceRecord(String, UUID)中的UUID保持一致。
  2. 通过调用connect()发起连接,客户端调用该方法以后,Android 会在新服务发现协议(SDP)数据库中查找UUID匹配的远程服务,如果查找并且连接成功,就会共享 RFCOMM 通道,同时connect()方法将会返回。如果连接失败,或者connect()超时约 12 秒以后,则该方法将会引发IOExceptionconnect()也是阻塞调用,因此需要在主 Activity 之外的线程中执行此连接操作。
1
2
3
4
5
6
7
8
9
10
11
12
13
14
15
16
17
18
19
20
21
22
23
24
25
26
27
28
29
30
31
32
33
34
35
36
37
38
39
40
41
42
43
44
45
46
47
48
private class ConnectThread extends Thread {
private final BluetoothSocket mmSocket;
private final BluetoothDevice mmDevice;

public ConnectThread(BluetoothDevice device) {
/* 由于 mmSocket 是 final 的,所以使用一个稍后分配给 mmSocket 的临时对象 */
BluetoothSocket tmp = null;
mmDevice = device;

try {
/* 通过 1 个 BluetoothSocket 连接指定的 BluetoothDevice */
tmp = device.createRfcommSocketToServiceRecord(MY_UUID);
} catch (IOException e) {
Log.e(TAG, "Socket's create() method failed", e);
}
mmSocket = tmp;
}

public void run() {
/* 取消发现,否则会降低连接速度 */
bluetoothAdapter.cancelDiscovery();

try {
/* 通过 Socket 连接到远程设备,该调用会在连接成功或者抛出异常之前一直阻塞 */
mmSocket.connect();
} catch (IOException connectException) {
/* 如果连接异常,则关闭 Socket 并且返回 */
try {
mmSocket.close();
} catch (IOException closeException) {
Log.e(TAG, "Could not close the client socket", closeException);
}
return;
}

/* 尝试连接成功,在单独的线程中执行与连接关联的工作 */
manageMyConnectedSocket(mmSocket);
}

/* 关闭客户端 Socket 并且结束线程 */
public void cancel() {
try {
mmSocket.close();
} catch (IOException e) {
Log.e(TAG, "Could not close the client socket", e);
}
}
}

数据读写

当成功连接多台设备以后,每台设备都会拥有已经完成连接的BluetoothSocket,接下来通过BluetoothSocket读写数据的步骤如下所示:

  1. 使用getInputStream()getOutputStream(),分别获取通过 Socket 处理数据传输的InputStreamOutputStream类;
  2. 使用read(byte[])write(byte[])读取或者写入数据流,由于这 2 个方法都属于阻塞调用,因此需要使用单独的线程来进行读写操作。
1
2
3
4
5
6
7
8
9
10
11
12
13
14
15
16
17
18
19
20
21
22
23
24
25
26
27
28
29
30
31
32
33
34
35
36
37
38
39
40
41
42
43
44
45
46
47
48
49
50
51
52
53
54
55
56
57
58
59
60
61
62
63
64
65
66
67
68
69
70
71
72
73
74
75
76
77
78
79
80
81
82
83
84
85
86
87
public class MyBluetoothService {
private static final String TAG = "MY_APP_DEBUG_TAG";
private Handler handler; // 从服务端获取信息的处理器

/* 定义在服务端与界面之间传输消息时使用的几个常量 */
private interface MessageConstants {
public static final int MESSAGE_READ = 0;
public static final int MESSAGE_WRITE = 1;
public static final int MESSAGE_TOAST = 2;

// ... 根据需要添加其它消息类型
}

private class ConnectedThread extends Thread {
private final BluetoothSocket mmSocket;
private final InputStream mmInStream;
private final OutputStream mmOutStream;
private byte[] mmBuffer; // 用于存储数据流

public ConnectedThread(BluetoothSocket socket) {
mmSocket = socket;
InputStream tmpIn = null;
OutputStream tmpOut = null;

/* 获取输入输出流,由于数据流被声明为 final 类型,所以这里使用了临时对象 */
try {
tmpIn = socket.getInputStream();
} catch (IOException e) {
Log.e(TAG, "Error occurred when creating input stream", e);
}
try {
tmpOut = socket.getOutputStream();
} catch (IOException e) {
Log.e(TAG, "Error occurred when creating output stream", e);
}

mmInStream = tmpIn;
mmOutStream = tmpOut;
}

public void run() {
mmBuffer = new byte[1024];
int numBytes; // 保存从 read() 返回的字节

/* 继续监听 InputStream 输入流,直至出现异常 */
while (true) {
try {
numBytes = mmInStream.read(mmBuffer); // 从输入流 InputStream 读取数据
Message readMsg = handler.obtainMessage( MessageConstants.MESSAGE_READ, numBytes, -1, mmBuffer); // 将获得的字节发送至界面 Activity
readMsg.sendToTarget();
} catch (IOException e) {
Log.d(TAG, "Input stream was disconnected", e);
break;
}
}
}

/* 从主 Activity 调用该方法来将数据发送到服务端 */
public void write(byte[] bytes) {
try {
mmOutStream.write(bytes);

/* 与界面 Activity 共享发送的消息 */
Message writtenMsg = handler.obtainMessage(MessageConstants.MESSAGE_WRITE, -1, -1, mmBuffer);
writtenMsg.sendToTarget();
} catch (IOException e) {
Log.e(TAG, "Error occurred when sending data", e);

/* 将失败消息发送给 Activity */
Message writeErrorMsg = handler.obtainMessage(MessageConstants.MESSAGE_TOAST);
Bundle bundle = new Bundle();
bundle.putString("toast", "Couldn't send data to the other device");
writeErrorMsg.setData(bundle);
handler.sendMessage(writeErrorMsg);
}
}

/* 从主 Activity 调用该方法以关闭连接 */
public void cancel() {
try {
mmSocket.close();
} catch (IOException e) {
Log.e(TAG, "Could not close the connect socket", e);
}
}
}
}

低功耗蓝牙

NFC

Android 物联网应用开发实例

http://www.uinio.com/Embedded/Android/

作者

Hank

发布于

2019-06-13

更新于

2020-02-24

许可协议